
Starlink has revolutionized internet access for businesses in rural areas, remote locations, and underserved markets. Unlike traditional satellite internet relying on distant geostationary satellites, Starlink’s low Earth orbit constellation delivers high-speed connectivity with significantly lower latency, making it viable for business operations requiring reliable internet.
This guide covers everything business owners need to know about Starlink antenna installation, from site assessment to optimizing your connection for commercial use.
What Is Starlink and How Does It Work?
Starlink is SpaceX’s satellite internet service using thousands of low Earth orbit satellites to provide high-speed internet access virtually anywhere. The system consists of a user terminal (the dish or antenna), a WiFi router, and a power supply unit connecting your business to satellites passing overhead.
Instead of communicating with one distant satellite 22,000 miles away, your Starlink antenna connects with multiple satellites only 340 miles above Earth. This proximity dramatically reduces latency and increases speeds, making activities like video conferencing, VoIP calls, and cloud-based operations practical on satellite internet.
What Comes in the Starlink Business Kit?
The Starlink Business kit includes:
• High-Performance Satellite Dish – Larger than residential models with enhanced weather resistance
• WiFi Router – Commercial-grade router with greater range
• Power Supply Unit – Outdoor-rated with weather-resistant design
• Starlink Cable – 75 feet (23 meters) connecting dish to router
• Mounting Base – Basic tripod stand for temporary placement
The kit does not include permanent mounting hardware. Commercial installations typically require roof, wall, or pole mounting accessories purchased separately.
How Long Does Commercial Starlink Installation Take?
Basic setup takes 30-45 minutes for temporary placement and testing. Permanent commercial installations requiring roof mounting, cable routing through walls, or integration with existing network infrastructure take 3-6 hours. Many businesses hire professional installers for permanent installations to ensure proper weatherproofing and cable management.
Finding the Optimal Location for Your Starlink Antenna
Proper placement is critical for reliable business connectivity. Your antenna needs an unobstructed view of the sky to maintain consistent satellite connections.
What Does “Clear View of the Sky” Mean for Starlink?
Starlink requires a clear view 20 degrees above the horizon in all directions (360 degrees azimuth). Trees, buildings, HVAC equipment, or other structures within this cone will cause service interruptions as satellites move across the sky.
For commercial properties, roof installations typically provide the best results by elevating the dish above most obstacles. Survey multiple locations on your property before committing to permanent mounting.
How Do I Check for Obstructions Before Installing?
The Starlink app includes an obstruction checker that shows exactly what your dish will “see” from any location:
1. Download the Starlink app on your smartphone
2. Navigate to “Check for Obstructions”
3. Scan the full 360-degree view at your proposed location
4. Review the visibility map – red areas indicate obstructions
5. Test multiple locations to find the optimal placement
Higher elevations consistently provide better results, which is why commercial installations favor rooftop mounting.
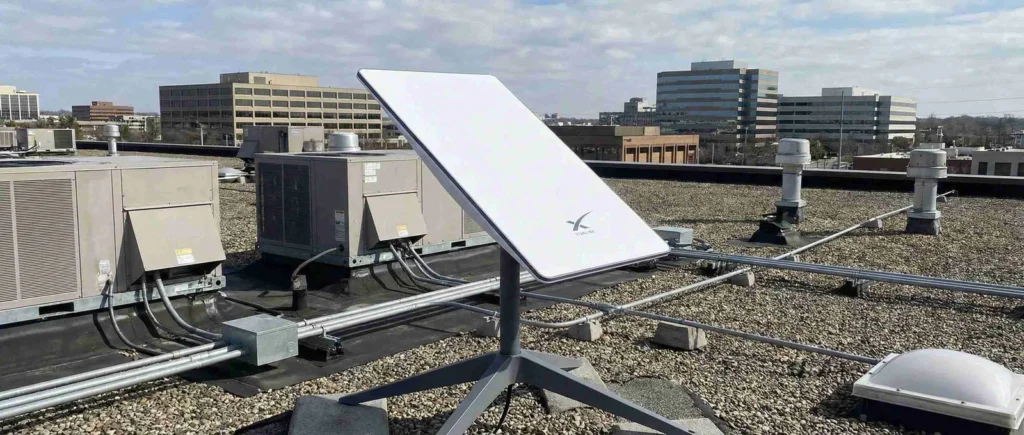
Should Businesses Install Starlink on the Roof or Ground?
Roof installation typically provides superior performance for commercial properties by elevating the dish above obstacles. Ground-level installations work for testing but often encounter obstructions from nearby structures, equipment, and landscaping.
Many businesses start with temporary ground placement to verify service quality before investing in permanent roof mounting. This approach confirms adequate coverage and speeds before modifying your building.
Commercial Starlink Mounting Options
Professional installations require dedicated mounting hardware designed for long-term outdoor use.
What Are the Best Mounting Options for Business Installations?
**Flashing Mount** – Professional roof penetration mount engineered to prevent leaks. Provides the most secure installation and cleanest appearance. Recommended for commercial flat or shingled roofs.
**Non-Penetrating Roof Mount** – Heavy ballasted base for flat roofs where penetrations aren’t permitted. Uses weight to remain secure without drilling. Ideal for leased properties or buildings with roof warranties.
**Wall Mount** – Suitable for exterior walls with clear sky visibility. Simpler installation than roof penetration. Best for low-rise commercial buildings.
**Pipe Adapter** – Attaches to existing poles or masts (1.5 to 2.5 inch diameter). Perfect for properties with existing mounting structures.
**J-Mount** – Versatile option providing 2-4 feet of elevation. Works on walls, eaves, or roof edges. Popular for multi-tenant properties.
Professional installers typically recommend flashing mounts or non-penetrating solutions for commercial properties to balance performance with building integrity.
Step-by-Step Starlink Installation for Businesses
Step 1: Download and Configure the Starlink App
Install the Starlink app and log into your business account. Complete the obstruction scan at your planned installation area. The app indicates if the location provides adequate satellite visibility for reliable service.
Step 2: Install Mounting Hardware
For permanent installations, install your chosen mounting hardware according to manufacturer specifications. Ensure proper weatherproofing for roof penetrations using appropriate flashing and sealant. For non-penetrating mounts, verify adequate ballast weight for your local wind loads.
Step 3: Mount and Position the Dish
Secure the Starlink antenna to your mounting hardware. Verify the dish has freedom to rotate and tilt without obstruction.
Does Starlink Antenna Need to Point in a Specific Direction?
No, you don’t need to manually aim the dish. Starlink automatically orients itself to establish optimal satellite connections. The dish rotates 360 degrees and tilts independently. Simply position it in a location with clear sky visibility, and the motors handle alignment automatically.
After applying power, allow 5-15 minutes for initial satellite search and alignment. The dish will move and adjust during this process.
Step 4: Route Cable to Your Network Location
The 75-foot cable provides substantial reach for most commercial installations. For permanent setups, consider:
• Drilling through exterior walls using 5/8-inch hole (cable diameter is 0.6 inches)
• Routing through existing cable entry points
• Using weatherproof conduit for exposed outdoor runs
• Installing cable trays or raceways for professional appearance
Maintain minimum bend radius of 2 inches throughout the cable run to prevent damage.
How Long Is the Starlink Business Cable?
The Starlink Business cable measures 75 feet (23 meters). This length cannot be extended with adapters. If you need greater distance, you must purchase longer cables directly from Starlink or position your router closer to the dish and use Ethernet for distribution to your network equipment.
Step 5: Connect Power and Router
Connect the Starlink cable to the router’s input port. Plug the router into the power supply unit. The power supply connects to a standard outlet. Starlink Business draws approximately 100-150 watts during normal operation.
Where Should I Mount the Power Supply?
Mount the power supply with connectors facing downward or sideways to prevent water intrusion. Ensure adequate ventilation as the unit generates heat. Indoor mounting in a mechanical room or communications closet is preferred for commercial installations.
If mounting outdoors, provide weather protection and ensure the location doesn’t trap heat. Overheating causes system shutdowns until the unit cools.
Step 6: Configure Your Business Network
After powering on, wait for the router’s status light:
• Flashing white – Connecting to satellites
• Solid white – Successfully connected
• Solid red – Connection failure after 20 minutes
Configure your WiFi network name and password through the Starlink app. For businesses, we recommend connecting a commercial-grade router or firewall for advanced network management, VLANs, and security features.
What Internet Speeds Can Businesses Expect from Starlink?
Starlink Business delivers 150-350 Mbps download speeds and 20-40 Mbps upload speeds with latency between 20-40ms. Priority data ensures business traffic receives bandwidth even during network congestion. Performance varies by location and satellite coverage density.
Business plans include higher priority than residential service, resulting in more consistent speeds during peak usage times.
Can I Use My Own Router with Starlink?
Yes, most businesses connect Starlink to their existing network infrastructure. You’ll need the Ethernet adapter accessory to connect your router, firewall, or switch to the Starlink system. This allows integration with enterprise equipment, VLANs, managed switches, and existing security systems.
Using commercial network equipment doesn’t affect satellite connection speed but provides advanced features like traffic management, VPN support, and multiple subnet configurations.
How Many Starlink Systems Can I Install at One Location?
Multiple Starlink systems can be installed at the same commercial location with minimum 3-foot separation between dishes. This provides redundancy, failover capability, or increased bandwidth for high-demand operations.
Use a commercial router to combine multiple connections for load balancing or automatic failover. Each dish requires its own subscription and power supply.
Troubleshooting Commercial Starlink Issues
Why Won’t My Starlink Connect?
If your dish won’t establish connection after 20 minutes:
1. **Obstructions** – Review the obstruction scan for blockages
2. **Power connections** – Verify all cables are fully seated
3. **Service address** – Confirm installation at registered business address
4. **Weather conditions** – Severe weather temporarily affects service
5. **Firmware updates** – Initial setup includes system updates
What Causes Service Interruptions?
Brief interruptions (seconds) occur during satellite transitions. Frequent or extended interruptions indicate:
• Obstructions blocking satellite visibility
• Dish shifted from original position
• Cable damage from bending or environmental stress
• Severe weather affecting signal transmission
Check the app’s obstruction viewer and 12-hour interruption history to identify specific problems.
Maintaining Your Commercial Starlink System
How Do I Clean the Starlink Dish?
Inspect quarterly and clean when debris accumulates:
1. Remove loose debris by hand
2. Use lukewarm water with mild soap
3. Wipe gently with microfiber cloth from center outward
4. Rinse with clean water
5. Never use pressure washers or abrasive cleaners
Does Weather Affect Starlink Performance?
The dish includes heating elements that melt snow and ice automatically. Light to moderate precipitation typically doesn’t affect service. Heavy storms may temporarily reduce speeds until conditions improve.
What Backup Power Options Work with Starlink?
Connect your Starlink system to a UPS (uninterruptible power supply) or generator to maintain connectivity during power outages. A 1500W UPS powers Starlink Business for 1-3 hours depending on load.
For critical operations, integrate Starlink with generator systems for extended backup capability.
Optimizing Starlink for Business Use
Should I Update Firmware Automatically?
Yes, enable automatic firmware updates. Starlink regularly releases improvements to performance, features, and satellite handoffs. Updates typically install during off-peak hours with minimal service interruption.
What’s the Best Network Configuration?
For optimal business use:
1. Connect Starlink to a commercial firewall or router
2. Implement VLANs to segment guest, employee, and IoT traffic
3. Configure quality of service (QoS) for VoIP and video conferencing
4. Enable business-grade security features
5. Set up monitoring to track usage and performance
This configuration provides enterprise-level security and management capabilities beyond the included router.